반응형

머신러닝 프로세스


과적합(Overfitting)

  • 훈련 데이터를 과하게 학습한 상태
  • 훈련 데이터에서의 정확도는 매우 높지만, 실제 서비스에서의 데이터에 대해서는 정확도가 좋지 않은 현상

과소적합(Underfitting)

  • 테스트 데이터의 성능이 올라갈 여지가 있음에도 훈련을 덜 한 상태
  • 대표적으로 Word2Vec


지도학습(Supervised Learning)

  • 데이터에 레이블이 있는 경우 → 데이터와 정답을 함께 넣어서 학습
  • 대표적으로 분류 문제가 있음

비지도학습(Unsupervised Learning)

  • 레이블 없이 주어진 데이터 안에서 학습
  • Word2Vec ⇒ 주변 단어는 서로 연관이 있을 것이다 라고 가정해서 주변 단어를 보고 학습
BERT 같은 최신 대규모 언어 모델들도 비지도 학습을 이용해서 1차적으로 모델을 학습하고 그 모델을 다른 Task에 적용하기 위해서 변경을 해줄 때 적은 데이터로 지도학습을 해준다.

강화학습(Reinforcement Learning)

  • 행동(Action)에 대한 보상(rewards) 기반으로 학습
  • 알파고 , 게임


회귀(Regression)

  • 원래 상태로 돌아가는 것
  • 회귀분석
    • 주어진 자료들이 특정한 경향성을 띄고 있다는 가정을 활용
  • 단순 회귀 분석(Simple Regression Analysis)
    • 하나의 종속변수에 대해 독립변수가 하나인 경우
  • 다중 회귀 분석(Multiple Regression Analysis)
    • 하나의 종속변수에 대해 독립변수가 둘 이상인 경우
종속변수 : 입력값이나 원인
독립변수 : 결과물이나 효과


반응형


선형회귀

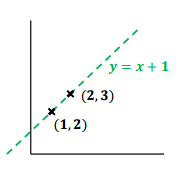
단순 선형 회귀 분석(Simple Linear Regression Analysis)

  • 데이터가 선형 경향을 띈다고 가정

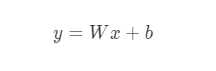
x : 독립변수 , W : 가중치(weight) , b : 편향(bias)


  • 가설에 대해서 적절한 W 와 b 를 찾아주는 문제
  • 위의 식을 두고 W와 b를 찾아가는 과정
y = 실제값 , H = 가설값


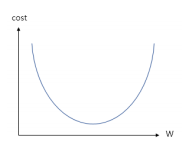
비용함수(cost function or Loss function)

  • 딥러닝에서도 똑같이 적용되서 잘 이해하고 넘어가자!! - 인공지능 전반적인 부분에 대해서도 이해가 잘 될것이다.
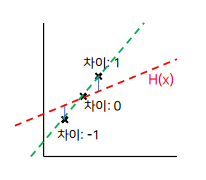
  • 가설과 실제 데이터를 넣었을 때의 값의 차이

W = 2 , b = 2 로 가정,,
x = 1 대입하면 H(x) = 4 , y = 2 (차이 : 2)
x = 2 대입하면 H(x) = 6 , y = 3 (차이 : 3)


  • 학습은 차이를 줄이는 방향으로 W와 b를 조정


가설과 실제 데이터의 차이 → H(x)-y 를 하면 0이 될 수 있는데 최적화된 값이라고 착각할 수 있음

해결하는 방법은?? 절대값 , 제곱

(H(x)-y)^2 제곱을 취하면, 차이가 큰 경우에 대해서 가중치가 높아지는 효과


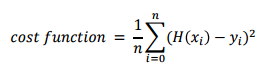
  • cost function : 차이를 제곱한 것들의 평균 → 평균 제곱 오차 (Mean Squared Error)
  • 단순 선형 회귀 분석에서는 MSE가 많이 활용됨
  • MAE , MSLE , MAPE , Cross-entropy 등 다양한 loss function이 존재하므로, 상황에 맞는 loss function 을 정의하는 것도 중요
    • 여기서 Cross-entropy는 조금 다른데 분류할 때 많이 쓰인다.


옵티마이저(Optimizer)

  • 비용 함수를 최소화하는 W와 b를 찾기 위한 최적화 작업을 학습이라고 부름
  • 학습하는 과정은 W와 b를 조정을 해가면서 최적의 값을 찾는 것
  • 학습하는 함수를 옵티마이저라고 부른다.


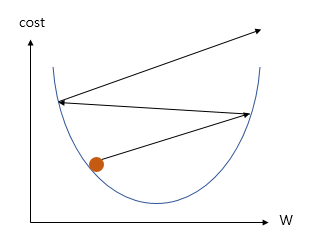
경사 하강법 (Gradient Descent)

  • 옵티마이저의 한 종류
  • 임의의 W값을 정한 뒤에, cost 가 최소가 되도록 W를 조금씩 수정하는 방법
  • 미분을 통한 접선에서의 기울기를 활용

  • 기울기를 조금씩 옮길때 learning rate를 곱한 만큼만 옮겨준다.


학습률 (Learning Rate)

  • W의 값을 변경할 때, 얼마나 크게 변경할지를 결정
  • 너무 크게 정하면 발산, 너무 작게 정하면 학습 속도가 느려짐


반응형
반응형

벡터화

  • 자연어가 기계가 이해할 수 있도록 숫자로 변환해주는 과정


원-핫 인코딩(One-Hot Encoding)

  • 단어 집합의 크기를 벡터의 차원으로 하고, 표현하고 싶은 단어의 인덱스에 1의 값을 부여하고, 다른 인덱스에는 0을 부여하는 벡터 표현 방식
  • 원-핫 인코딩 과정
    1. 각 단어에 고유한 인덱스 부여
    2. 표현하고 싶은 단어의 인덱스에 1, 아닌 단어에는 0 부여


원-핫 인코딩 실습1

from my_tokenizer import tokenize

# 사전 생성
def make_vocab(tokens):
    word2index = {}
    for voca in tokens:
        if voca not in word2index.keys():
            word2index[voca] = len(word2index)
    return word2index

# 원핫인코딩
def one_hot_encoding(word, word2index):
    one_hot_vector = [0] * (len(word2index))
    index = word2index[word]
    one_hot_vector[index] = 1
    return one_hot_vector


if __name__ == '__main__':
    document = '안녕하세요. 이번에 같이 교육받게 된 김지선이라고 합니다.'
    tokens = tokenize(document, 'lemma')
    word2index = make_vocab(tokens)
    # print(word2index)
    print('dictionary:', word2index) 
    print(one_hot_encoding('같이', word2index))


원-핫 인코딩 실습2

import nltk
from nltk.tokenize import sent_tokenize
from nltk import WordPunctTokenizer
from nltk.stem import LancasterStemmer
from nltk.stem import WordNetLemmatizer


class Tokenizer:
    def __init__(self, tokenize_type): # 클래스로 만들어서 self 가 자동으로 붙음
        self.type = tokenize_type

    def make_vocab(self, document):
        tokens = self.tokenize(document)
        word2index = {'<unk>': 0}
        for voca in tokens:
            if voca not in word2index.keys():
                word2index[voca] = len(word2index)
        self.vocab = word2index
        print('dictionary:', self.vocab)

    # types = ['stem', 'lemma', 'pos']
    def tokenize(self, document):
        words = []
        sentences = sent_tokenize(document)  # sentence tokenizing
        for sentence in sentences:
            words.extend(WordPunctTokenizer().tokenize(sentence))  # word tokenizing
        if self.type == 'stem':
            lancaster_stemmer = LancasterStemmer()
            tokenized = [lancaster_stemmer.stem(w) for w in words]  # stemming
        elif self.type == 'lemma':
            lemmatizer = WordNetLemmatizer()
            tokenized = [lemmatizer.lemmatize(w).lower() for w in words]  # lemmatizing
        elif self.type == 'pos':
            # tokenized = nltk.pos_tag(words) # pos tagging
            tokenized = [token[0] + '/' + token[1] for token in nltk.pos_tag(words)]
        else:
            raise TypeError
        return tokenized

    def one_hot_encoding(self, word):
        one_hot_vector = [0] * (len(self.vocab))
        if word not in self.vocab:
            word = "<unk>"
        index = self.vocab[word]
        one_hot_vector[index] = 1
        return one_hot_vector

    def get_vector(self, sentence):
        # return 2차원 배열
        tokens = self.tokenize(sentence)
        print('Tokenized:', tokens)
        return [self.one_hot_encoding(token) for token in tokens]


if __name__ == '__main__':
    document = 'Hi! 안녕하세요.\n 이번에 같이 교육받게 된 김지선\n이라고 합니다.'
    tokenizer = Tokenizer('lemma')
    tokenizer.make_vocab(document)
    print(tokenizer.get_vector('hi, 같이 김지선'))


반응형
반응형

전처리 이해

  • 토큰화
    • 주어진 데이터를 토큰(Token)이라 불리는 단위로 나누는 작업
    • 토큰이 되는 기준은 다를 수 있음(어절, 단어, 형태소, 음절, 자소 등)
  • 정제
    • 불필요한 데이터(Noise data)를 제거하는 작업
  • 정규화
    • 표현 방법이 다른 단어들을 통합시켜서 같은 단어로 만들어주는 작업
  • 문장 토큰화
  • 문장분리
  • 단어 토큰화“Hello, World!” -> “Hello”, “,”, “World”, “!”
  • 구두점 분리, 단어 분리


토큰화 실습

# 문장 분리 
from nltk.tokenize import sent_tokenize 
text = "Hello, world. These are NLP tutorials." 
print(sent_tokenize(text))


import nltk from nltk import WordPunctTokenizer 
nltk.download('punkt') 
text = "Hello, world. These are NLP tutorials." 
print(WordPunctTokenizer().tokenize(text))


정제&정규화

  • 불필요한 데이터를 제거하는 작업
  • 표기가 다른 단어들의 통합 예시) US, USA -> USA, 어간 추출(stemming), 표제어 추출(lemmatization)
  • 대소문자 통합: 문장 첫 글자 문제
  • 불필요한 단어 제거 예시) 불용어(stopwords), 영어가 아닌 외국어
  • 정규표현식

어간추출&표제어 추출

  • 어간추출(stemming)
    • 축약형으로 변환
  • 표제어추출(lemmatization)
    • 품사 정보가 보존된 형태의 기본형으로 변환


어간추출&표제어추출 실습

### 어간 추출 ###

from nltk import WordPunctTokenizer
from nltk.stem import PorterStemmer
from nltk.stem import LancasterStemmer

text = "Hello, world. These are NLP tutorials."
words = WordPunctTokenizer().tokenize(text)
print(words)
porter_stemmer = PorterStemmer()
print([porter_stemmer.stem(w) for w in words])
lancaster_stemmer = LancasterStemmer()
print([lancaster_stemmer.stem(w) for w in words])


#### 표제어 추출 ####

import nltk
from nltk import WordPunctTokenizer
from nltk.stem import WordNetLemmatizer
nltk.download('wordnet')
text = "Hello, world. These are NLP tutorials."
words = WordPunctTokenizer().tokenize(text)
lemmatizer = WordNetLemmatizer()
print(words)
print([lemmatizer.lemmatize(w) for w in words])


반응형


불용어 실습

## 불용어 확인 ##

import nltk
from nltk.corpus import stopwords

nltk.download('stopwords')
english_stopwords = stopwords.words('english')
print(len(english_stopwords))
print(english_stopwords[:10])


## 불용어 제거 ##
from nltk.corpus import stopwords
from nltk import WordPunctTokenizer

text = "Hello, world. These are NLP tutorials."
stop_words = stopwords.words('english')
stop_words.append('hello')

words = WordPunctTokenizer().tokenize(text)
words = [word.lower() for word in words]


result = []
for word in words:
    if word not in stop_words:
        result.append(word)
print(words)
print(result)


POS Tagging, Named Entity Recognition 실습

# POS tagging (part of speeck tagging)
# Named Entity Recognition

import nltk
from nltk import WordPunctTokenizer

nltk.download('averaged_perceptron_tagger')
nltk.download('words')
nltk.download('maxent_ne_chunker')

text = "Hello, world. These are NLP tutorials."

word = WordPunctTokenizer().tokenize(text)
tagged = nltk.pos_tag(word)
entities = nltk.chunk.ne_chunk(tagged)

print(word)
print(tagged)
print(entities)


토크나이저 실습

import nltk
from nltk.tokenize import sent_tokenize
from nltk import WordPunctTokenizer
from nltk.stem import LancasterStemmer
from nltk.stem import WordNetLemmatizer

types = ['stem', 'lemma', 'pos']

def tokenize(document, type):
    words = []

    sentences = sent_tokenize(document) # sentence tokenizing
    for sentence in sentences:
        words.extend(WordPunctTokenizer().tokenize(sentence)) # word tokenizeing

    # sentence tokenizing
    # word tokenizing
    # 타입에 따라서 토큰으로 분리
    if type == 'stem':
        lancaster_stemmer = LancasterStemmer()
        tokenized = ([lancaster_stemmer.stem(w) for w in words]) # stemming
    elif type == 'lemma':
        lemmatizer = WordNetLemmatizer()
        tokenized = ([lemmatizer.lemmatize(w) for w in words]) # lemmatizing
    elif type == 'pos':
        # tokenized = nltk.pos_tag(words) # pos tagging
        tokenized = [token[0]+'/'+token[1] for token in nltk.pos_tag(words)]
    else:
        raise TypeError
    return tokenized

if __name__ == '__main__':
    document = '안녕하세요. 이번에 같이 교육받게 된 김지선이라고 합니다.'
    print(tokenize(document, 'pos'))


반응형
반응형

자연어란?

  • 자연어(Natural Language)는 사람과 사람이 일상 생활에서 서로 대화하는데 사용하는 언어를 뜻함

자연어 처리

  • 자연어의 의미를 분석하여 컴퓨터가 처리할 수 있도록 하는 일
  • 전처리를 위한 형태소 분석, 개체명 인식, 구문 분석부터 음성 인식, 내용 요약, 번역, 사용자의 감성 분석, 텍스트 분류 작업(스팸 메일 분류, 뉴스 기사 카테고리 분류), 질의 응답 시스템, 챗봇 등의 응용분야에 활용이 됨


전처리 이해

  • 토큰화

    • 주어진 데이터를 토큰(Token)이라 불리는 단위로 나누는 작업
    • 토큰이 되는 기준은 다를 수 있음(어절, 단어, 형태소, 음절, 자소 등)
  • 정제

    • 불필요한 데이터(Noise data)를 제거하는 작업
  • 정규화

    • 표현 방법이 다른 단어들을 통합시켜서 같은 단어로 만들어주는 작업
  • 문장 토큰화

    문장분리

  • 단어 토큰화

    구두점 분리, 단어 분리

    “Hello, World!” -> “Hello”, “,”, “World”, “!”


Task의 종류

  • Part-of-Speech 태깅
  • 형태소 분석(한글)
  • 개체명 인식
  • 구문 분석
  • 상호 참조
  • 감정 분석
  • 번역
  • 질의 응답
  • 기계 독해
  • 텍스트 생성
  • 텍스트 요약
  • 대화 시스템(챗봇)
  • 언어 모델


형태소 분석

  • 형태소
    • 의미가 있는 최소 단위
    • 문법적, 관계적은 뜻을 나타내는 단어 또는 단어의 부분
  • 단어를 구성하는 각 형태소를 분리하고 기본형 및 품사 정보를 추출

예시) 회사는 서울시 강남구에 위치하고 있습니다.

회사/NNP+는/JX 서울시/NNP 강남구/NNP+에/JKB 위치/NNG+하/XSV+고/EC 있/VX+습니다/EF+./SF


개체명 인식

  • 개체명
    • 사람이름, 회사이름, 지명, 영화제목, 날짜, 시간 등
  • 개체명 인식
    • 텍스트에서 개체명을 찾아서 태깅하는 것

예시) 회사는 서울시 강남구에 위치하고 있습니다. 회사<OG>, 서울시<LC>, 강남구<LC>


구문 분석

  • 문장을 이루고 있는 구성 성분으로 분해하고, 위계 관계를 분석하여 문장의 구조를 결정하는 것


기계 독해

  • 주어진 문서를 빠르게 이해하고 문서에 기반하여 질문에 대한 답을 찾아내는 기술


언어 모델(Language Model)

  • 언어라는 현상을 모델링하고자 단어 시퀀스(또는 문장)에 확률을 할당하는 모델
  • 언어모델이 주어지면, 확률분포를 가지고 단어의 시퀀스를 뽑을 수(sample) 있으며, 텍스트를 생성할 수 있다는 뜻으로 생성 모델이라고도 불림
  • 언어 모델을 만드는 방법은 통계를 활용하는 방법과, 인공 신경망을 이용한 방법이 있음
앞에 있는 입력을 가지고 뒤에 뭐가 나올지 예측하는 것
- BERT, GPT

언어모델의 예시


반응형
반응형

라이브러리 다운로드

실습 전 nltk 라이브러리를 먼저 다운로드 받는다

File > Settings 를 들어간다

오른쪽 위에 + 버튼을 클릭한다.

다운받을 라이브러리 검색 후 하단의 Install Package 를 클릭한다.

라이브러리 에러 메세지

# 오류 메세지

Collecting package metadata (current_repodata.json): ...working... failed


CondaHTTPError: HTTP 000 CONNECTION FAILED for url <https://repo.anaconda.com/pkgs/main/win-64/current_repodata.json>
Elapsed: -

An HTTP error occurred when trying to retrieve this URL.
HTTP errors are often intermittent, and a simple retry will get you on your way.

If your current network has https://www.anaconda.com blocked, please file
a support request with your network engineering team.

'https://repo.anaconda.com/pkgs/main/win-64'


에러 해결 방법 1

  1. "아나콘다 경로/Library/bin" 파일 열기
  2. libcrypto-1_1-x64.dll libcrypto-1_1-x64.pdb libssl-1_1-x64.dll libssl-1_1-x64.pdb 파일 4가지 복사
  3. "아나콘다 경로/DLLs/" 경로에 붙여넣기

에러 해결 방법 2
시스템 환경변수 Path에 "아나콘다경로\Library\bin" 추가

반응형

'프로그래밍 언어 > Python' 카테고리의 다른 글

[Python] 기초 문법  (0) 2020.09.27
[Python] 파이썬-파이참 설치하기  (0) 2020.09.27

+ Recent posts